Most B2B sites get traffic that will never convert. You can see the visits, maybe even the countries, but you have no clue who those people are. That’s why we made this workflow. This is the exact setup we use to turn anonymous website visitors into verified, segmented leads automatically, and you can copy-paste it for your company or clients.
Step 1: Set Up R!B2B (Free)
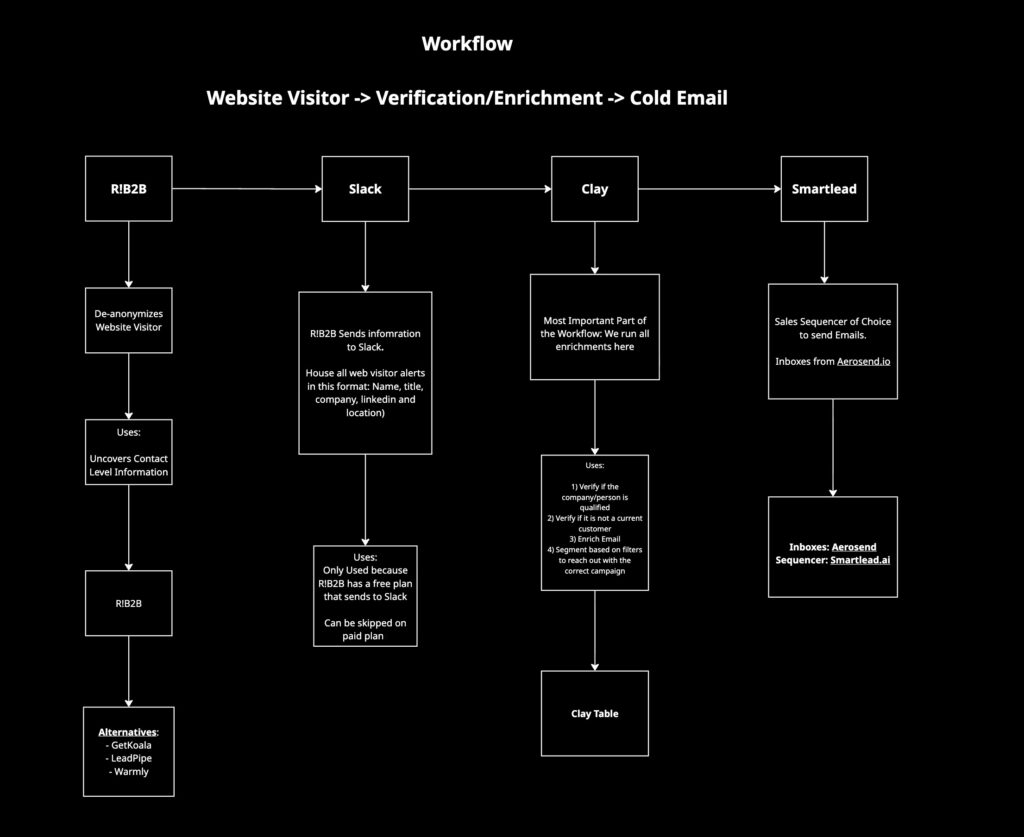
R!B2B helps you de-anonymize website traffic and see who is visiting your site, including names, titles, companies, LinkedIn profiles, and locations.
Here’s how to set it up:
- Create an account on R!B2B
- Add the tracking pixel to your website
- Integrate it with Slack (optional but recommended for free users)
Now, every time someone from your ICP visits your site, you’ll get an alert with their details.
Alternatives: Warmly, GetKoala, LeadPipe
Step 2: Connect Everything in Make.com
Next, we use Make.com to automate the workflow between R!B2B, Slack, and Clay.
Make.com Template HERE
Setup steps:
- Connect your Slack account
- Add your Clay inbound webhook details
Here’s what happens behind the scenes:
The Make.com workflow watches your Slack channel for new R!B2B messages, extracts the LinkedIn profile and other details, and sends a clean JSON payload to Clay for enrichment.
Step 3: Build Your Clay Table
Once your Make workflow sends the data over, Clay handles all the enrichment and verification work.
CLAY TABLE HERE
Here’s what your Clay setup should do:
1) Check job title validity.
Website visitors sometimes have odd or unqualified titles. Filter them first.
2) Enrich company data
Pull details like employee size, funding, industry, and location to confirm ICP fit.
3) Verify if they’re already a customer
Cross-reference leads against your CRM (HubSpot, Airtable, etc.) to avoid duplicate outreach.
4) Segment the list
Group leads by campaign relevance. For example:
SMBs vs. Enterprise
Senior execs vs. managers
Funded vs. non-funded startups
5) Send to Smartlead
Route each segment to the appropriate Smartlead campaign.
Step 4: Send Leads to Smartlead.ai
Finally, Smartlead takes over your outreach.
Here’s how we set it up:
- Use Aerosend.io inboxes for high deliverability
- Create multiple campaigns based on your Clay segments
- Sync verified leads to the right campaign via Smartlead API
Smartlead ensures your emails land in the inbox and not in spam, which is especially important when scaling outreach.
Use Cases for This Workflow
This setup isn’t just for lead capture. You can use it for:
- Executive engagement: reach key decision-makers who visited your pricing page
- Timing-driven sequences: automate follow-ups based on recent activity
- Strategic account expansion: find other key people from existing customer accounts
- Early-stage relationship building: start nurturing warm website visitors long before they book a call